
We did it! Hue’s birthday came and went successfully! Get ready for a full break down of all the things I made and purchased for Hue’s first birthday party, where we had it, invitations, and my thoughts on all of it…
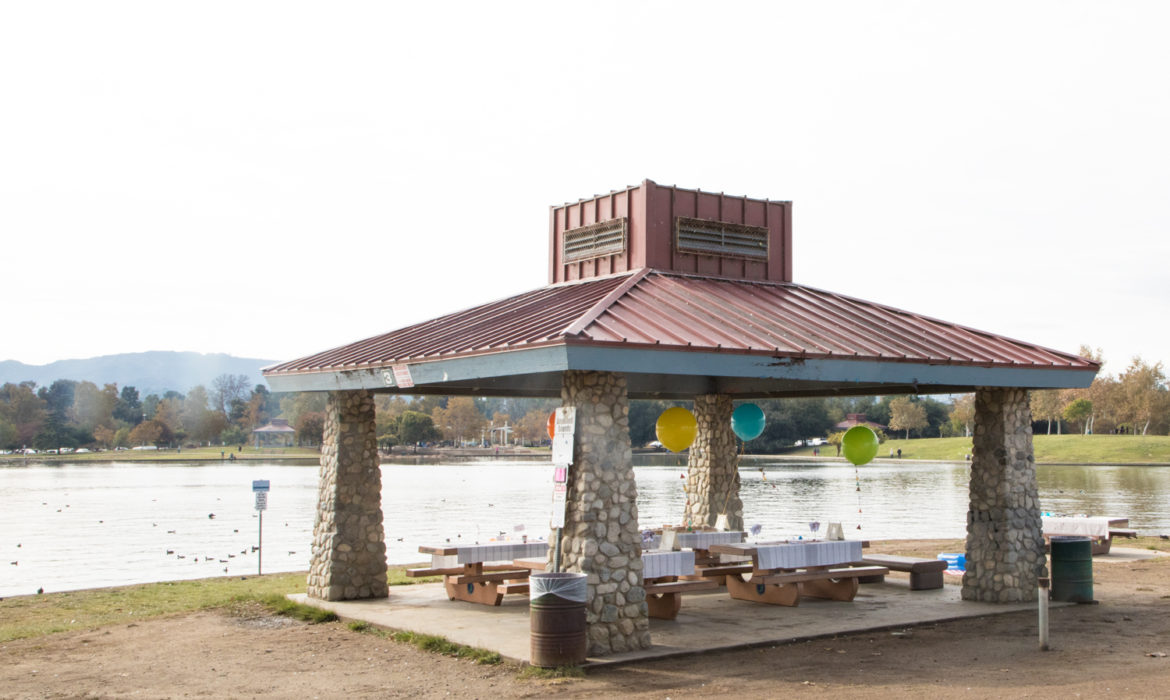
First things first. Invitations! I explained how I made them and where I got the idea for the location of Hue’s party here.
I handmade them and love how they came out. They are super special to me and they had me painting again so I got to be super creative which is usually when I am my best self.

Table Top Paper Goods projects and DIY’s. Most all of the things I could make, I did. I am super crafty and a graphic designer so if I was going to implement those skills this is the time to do it! As I explained in the invitation post I got my inspiration from one of my favorite movies ever, Moonrise Kingdom.
Here is what I hand made:
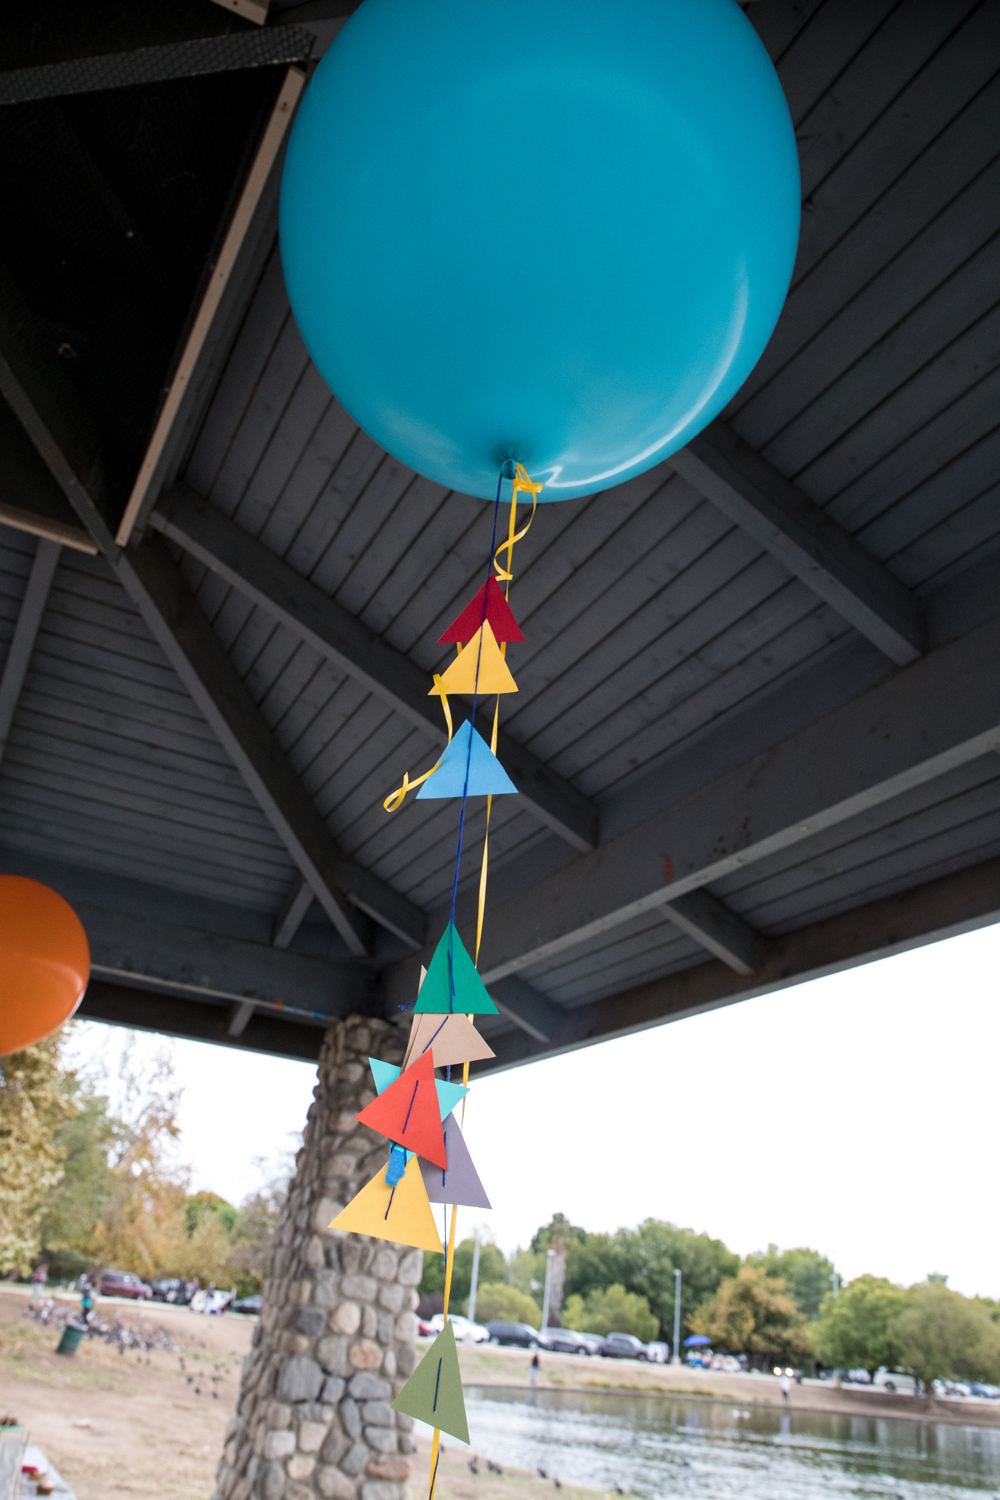
The triangle / arrow streamers that hung off the giant balloons. I got this idea from Pinterest. I tried to do the same colors that I had on my invitations. So there was a continuity there but it was also colors I thought would work with the theme. I bought some card stock from Michael’s and just bought a piece or two of colors that worked or I liked. I made a triangle template that you can download here. I proceeded to cut out what felt like a million triangles. I punched a whole with a hole-puncher on a tip of a triangle and strung white utility string through all the triangle holes. I left them hanging on my wall with tape on the bottom and top (Hue and my cat were very curious by the triangle streamers!) and I made sure to leave extra string on the top and bottom for tying and length needs once tied to the balloons. I made the streamers extra long planning to cut them but I like the way they floated in the wind so I kept them at their original length.
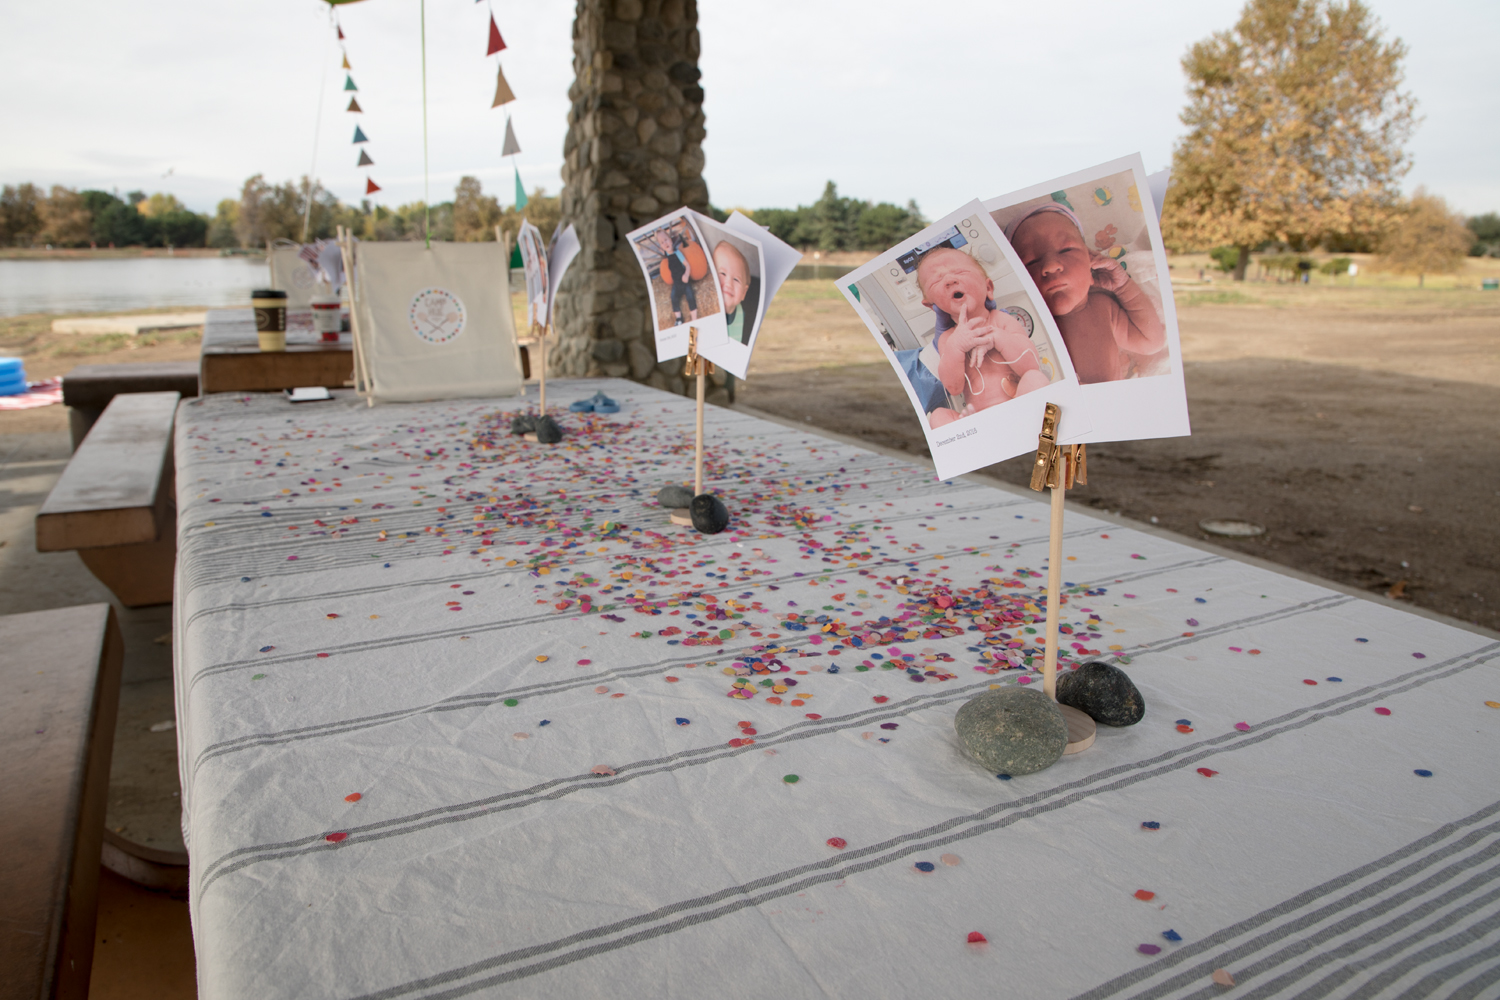
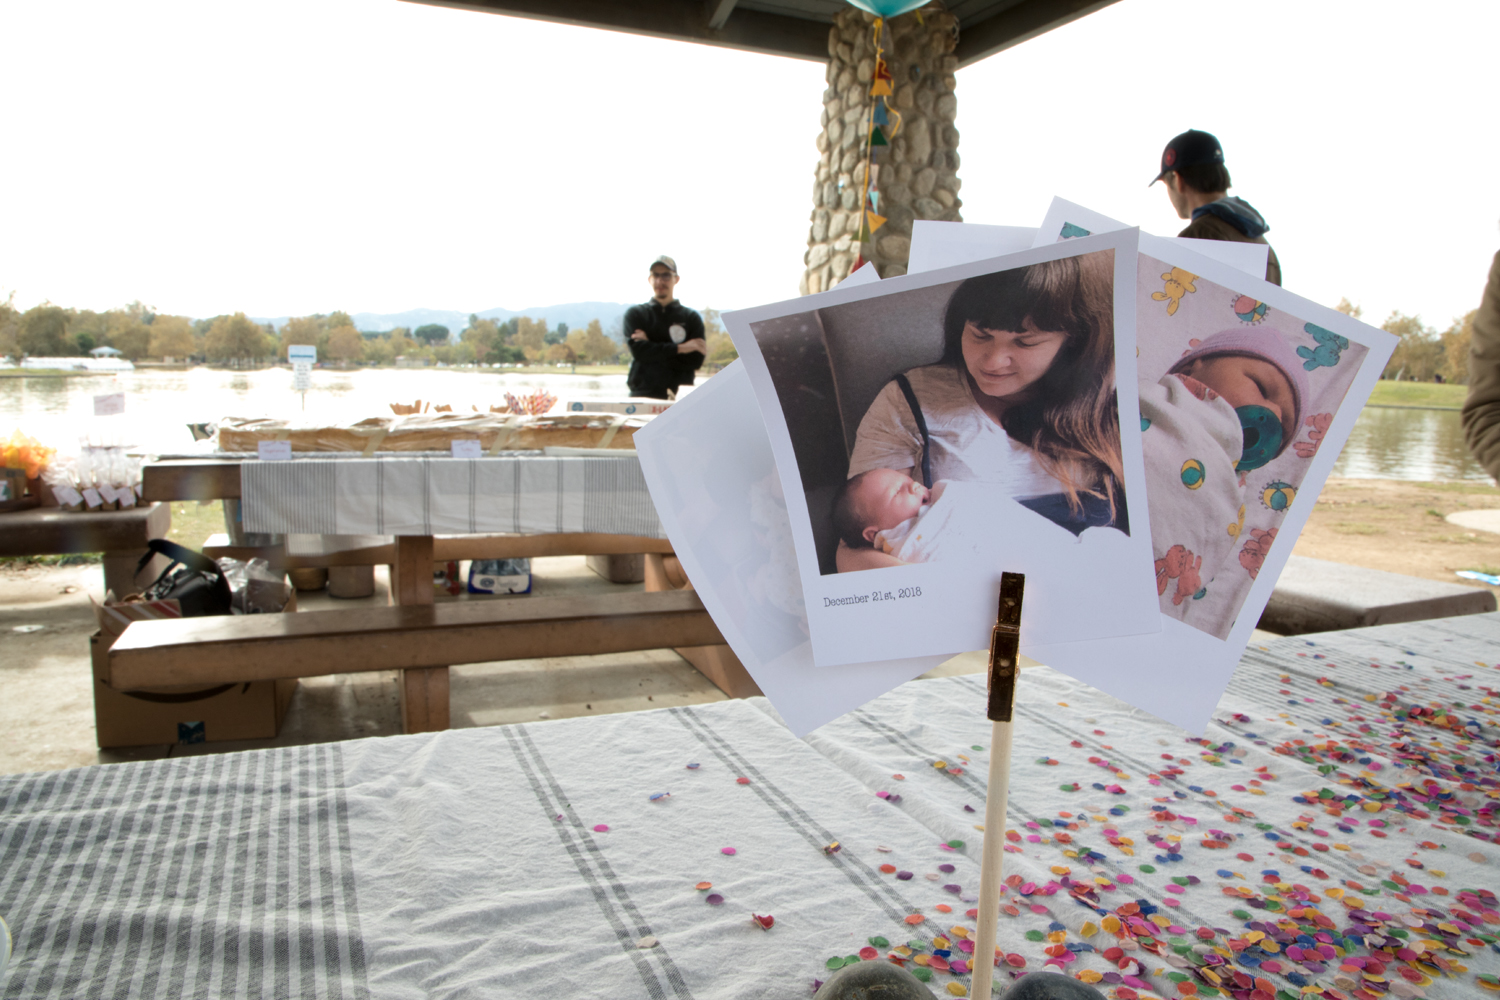
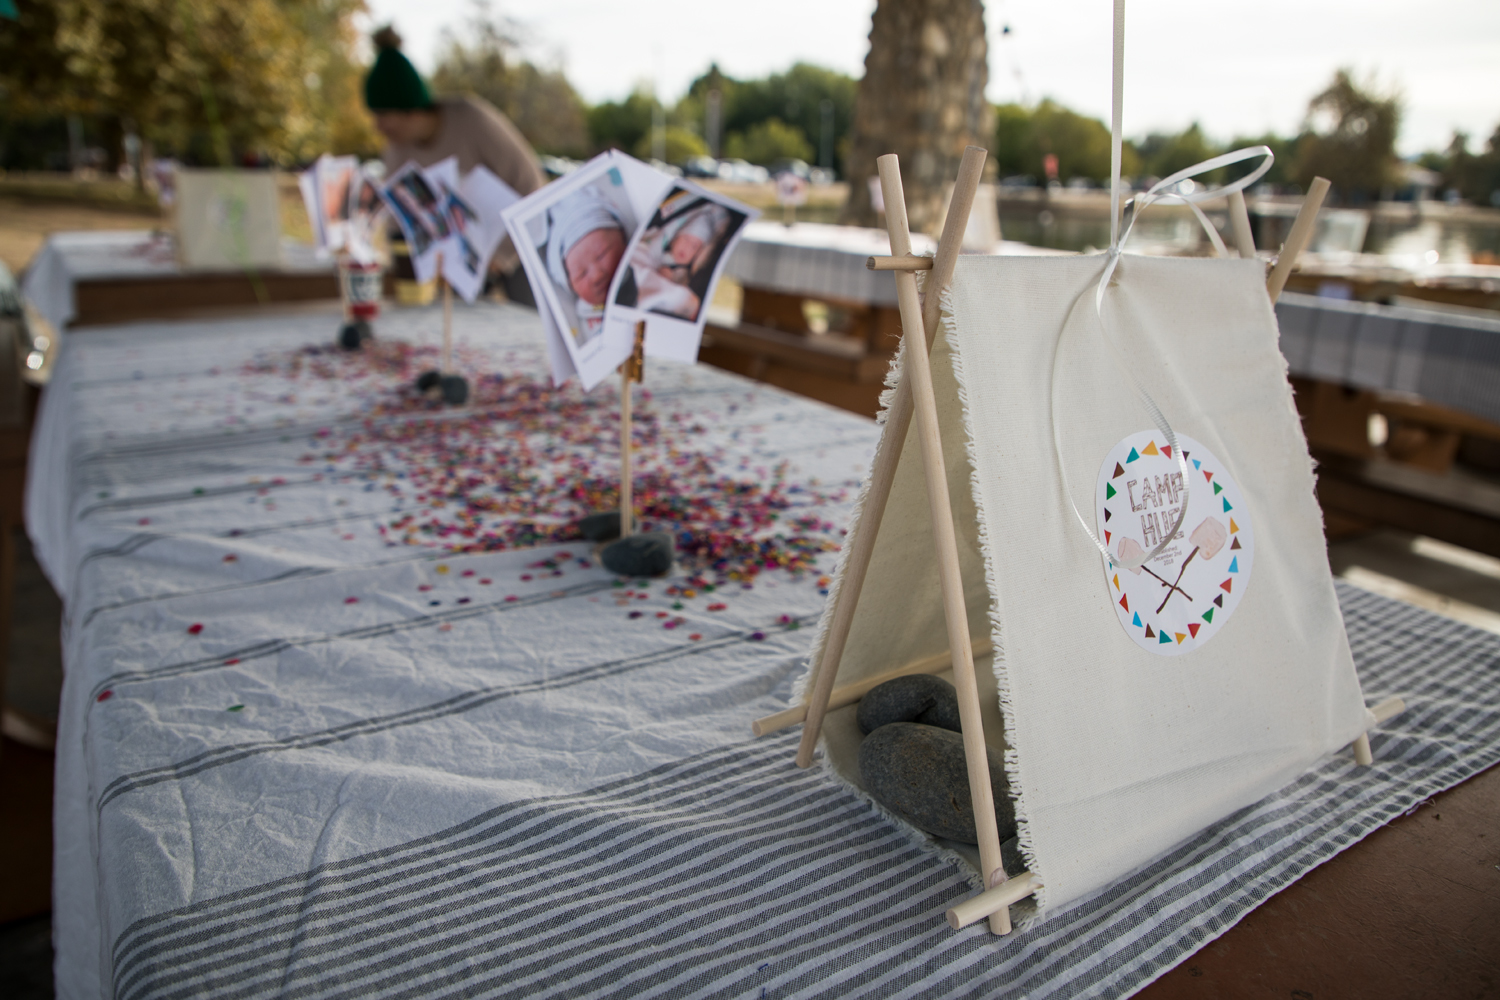
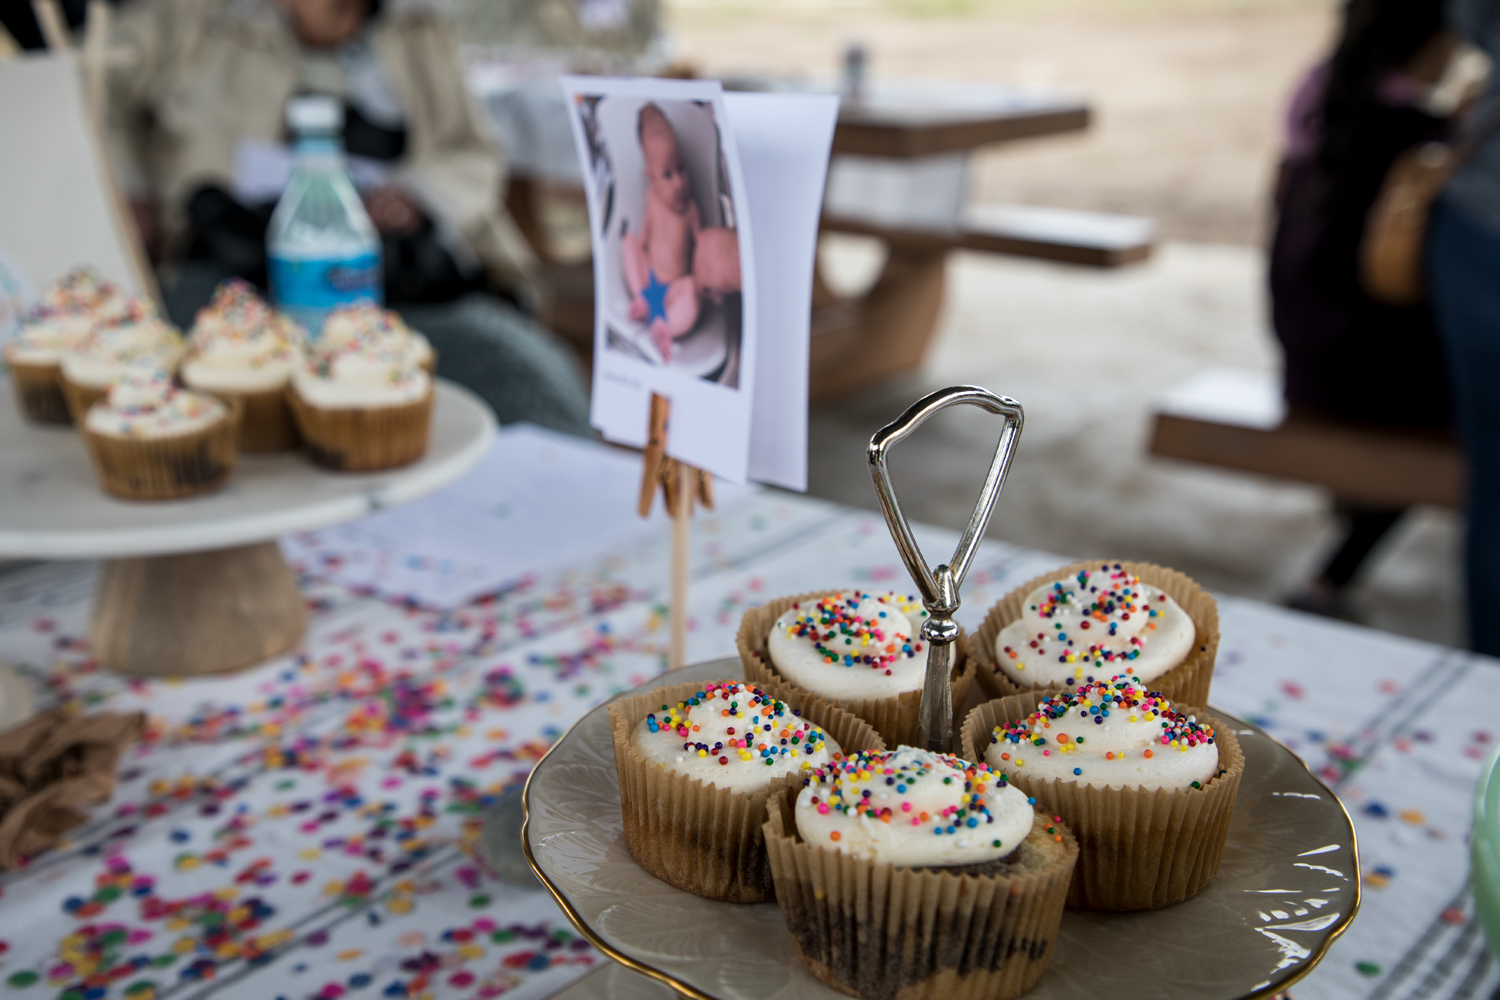
Polaroids of Hue from each month of his first year that were on each table. I made my own polaroid template that you can use here. If you don’t want to use the date place holder just delete it. I made a template in photoshop that was 4″ x 4″ and edited all of my pictures there and saved them as jpegs. I dropped the edited jpegs in my illustrator template and printed and trimmed. I picked a few of my favorite pictures and added the date the picture was taken. I made my own picture holders which were a super cute idea but it was a super cold day and they were definitely blowing over and I had to secure them with some rocks that I bought for the craft. I ended up buying a huge 40 lb bag of rocks from home depot because the craft ones were like way more expensive for 10 rocks. I am so glad I did because I used the rocks as weights for everything!
Wooden Picture Holders DIY. I ended up making these out of pure necessity and loved how they turned out! I used a 6″ dowel and craft wood circles. I had these rose cold mini clothespins on hand. These are more gold than rose gold but this is the packaging they came in just more of a rose gold color than a true gold color. I hot glued the dowel to the middle of the wood circle. I hot glued the clothes pin (one on each side) so the pinching side was on the bottom and the grip part was facing upwards to grab the picture. I held everything down with the rocks I mentioned before and it turned out super cute. It was a walk down Hue’s first year of life and it was out on display for our guests to look at.
DIY A-Frame Tents. These are so cute and I couldn’t find any inspiration for these so I figured out how to make these on my own. I used to design for a kids play tent company so I kind of new the basic assembly of how the play tents were built. I used that same idea but super mini for the table. I made these for the balloons to tie on to. I ended up shoving a ton of rocks inside the A-frame which ended up looking super cute and fit with the theme which was unplanned but ended up working. Yay! Love when that happens. For the material I got some white/cream muslin. I was planning on going to a fabric store but found it while getting a lot of supplies at Michaels so one less trip for me. I forgot they carried some fabric options and was so excited not to have to go to a different store just for some simple fabric. I couldn’t find it at Michael’s online store but it came pre-cut and I think it was a 1/2 a yard or maybe even a yard and it was the perfect amount of fabric I needed. To start you will need 12″ dowels, hot glue and fabric. You can see the steps I followed here. I hand-made these stickers I designed and had someone else print them and talked about them in the invitation post. If your curious go read all about it! I had originally made these as camp badges but over ordered knowing they would come in handy for other things too. I slapped some on these A-frames and it really looked perfect!. I punched a hole in the middle/top part of the muslin A-frame for the balloon ribbon to go through. I loved these and fell in love with them immediately. I had four tables so I made four of them. I made them a couple of weeks early so I got to admire my work as I past by the dining room.
Some other things for the table top that I already had. The table cloths were from Hue’s shower and the colorful confetti was leftover from the DIY Baby Reveal Boxes. This is how I told our family and close friends we were pregnant with Hue! If you want to know how I made them go read this post!
I bought the four camping coffee mugs in the dollar section at Target in the summertime. They were a $1 each and great for the utensils and straws. I ordered bamboo utensils, paper colorful striped straws and kraft paper plates and napkins from Amazon.
Crafts | Ball Pit | Bubble Machine + Bubbles | Camp Badges | Animal Ears | Games
This was like all the entertainment for the party. I really tried to make it for Hue’s age but I knew a lot of adults would be there so I needed to entertain them too.
Let’s start with crafts. As I mentioned before I bought a 40 lb bag of rocks. The originally intent for them was this craft. I got them so people could paint and glue whatever they wanted onto them. I bought paint, brushes, google eyes, and glue sticks so you could paint and design whatever you wanted. I had some of my friends that came early to help make a few example rocks so people knew what to do when they came to the craft table. The thought was you could write your name on them or put some google eyes on it and call it a day but everyone got super creative and at the end of the party the craft table was full of people creating things and my art heart was so full and happy to see that! Everyone’s heads were down concentrating on their works of art. Sign of a great party! My friend had just bought a new home and I gave her the little bit of rocks that were left over.
I had another craft that was more age appropriate for toddlers. I pre-cut some tree tops, tree trunks and fall leaves. My intentions were for the younger kids to put together the trees with glue sticks and make it with the help of an adult. I don’t know if anyone made them because I got too busy. I can’t fully remember but I think I made one quickly so people could see my intentions for the tree parts.
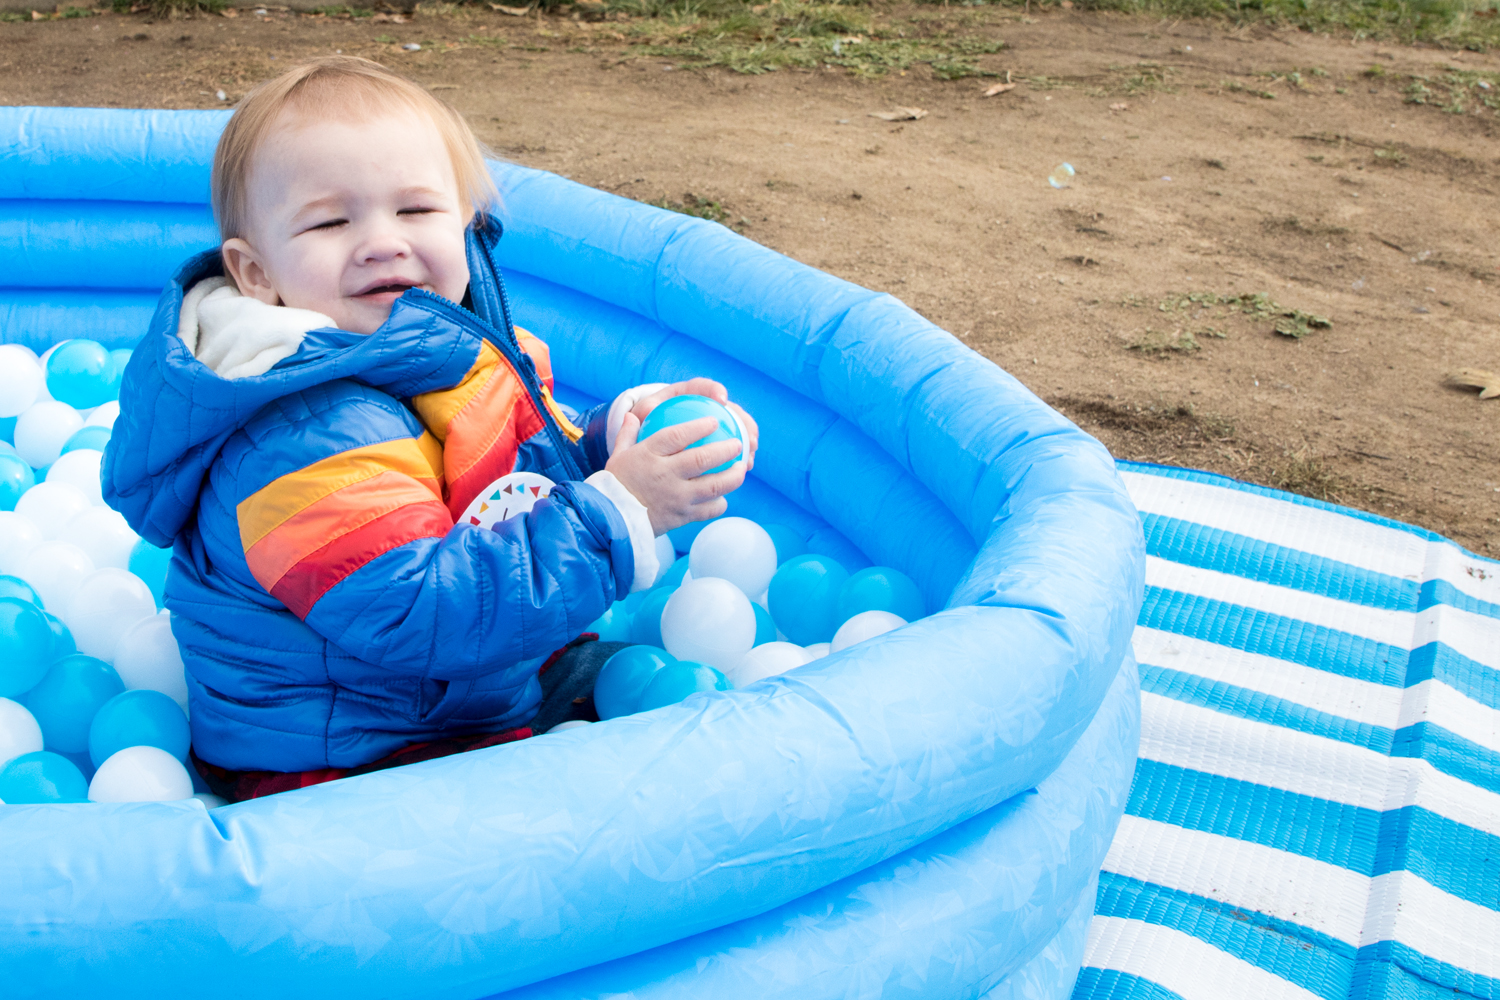
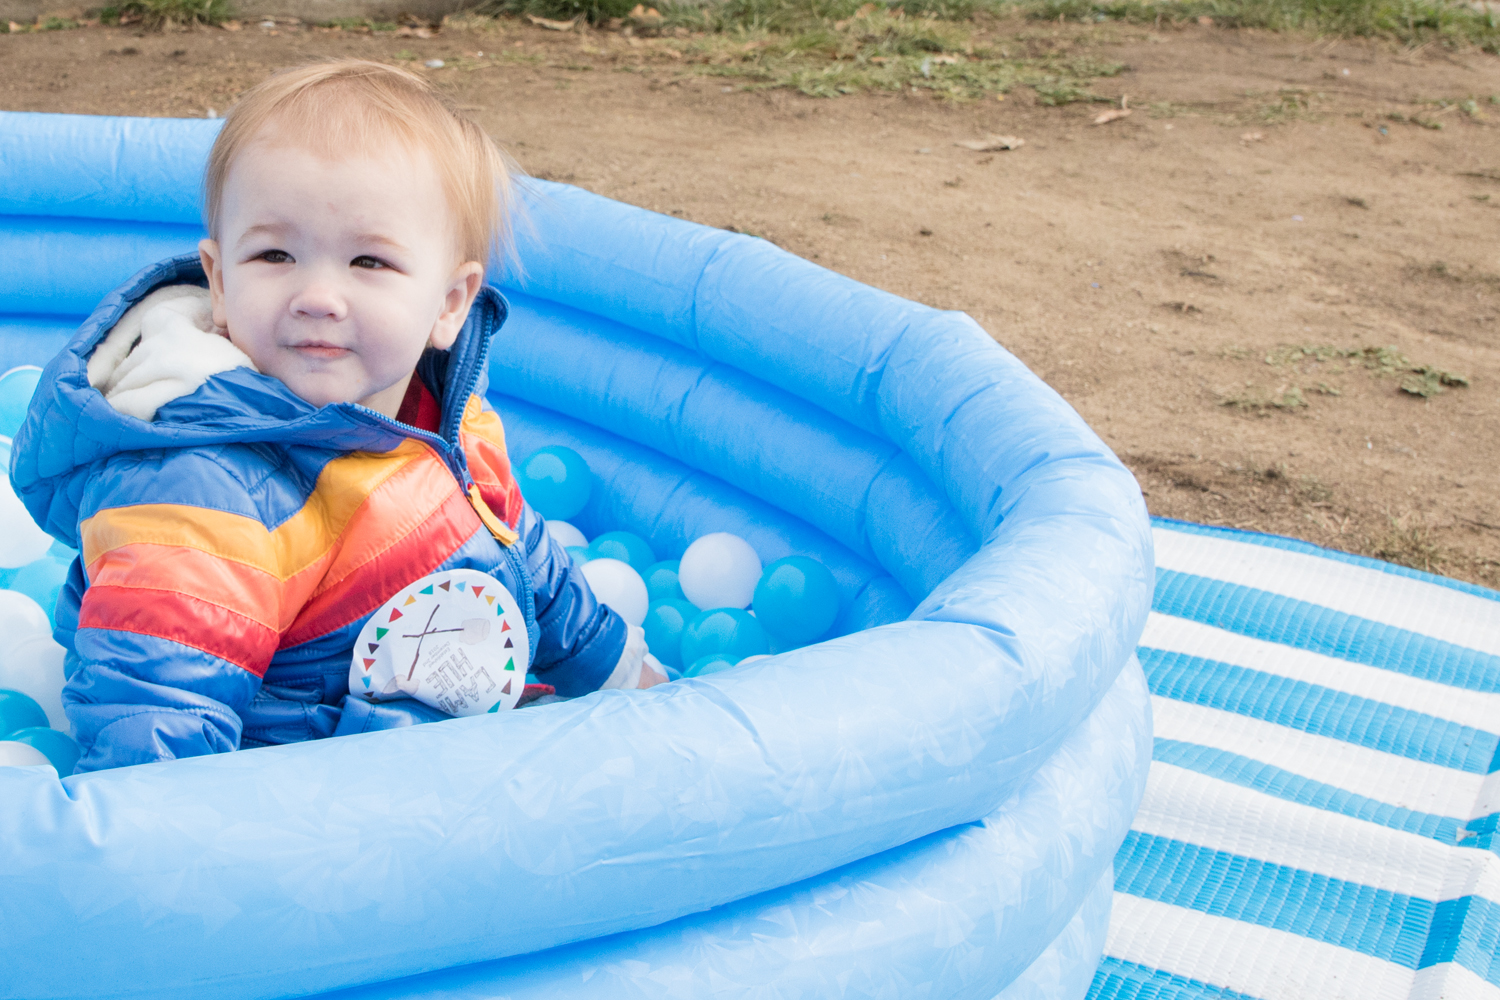
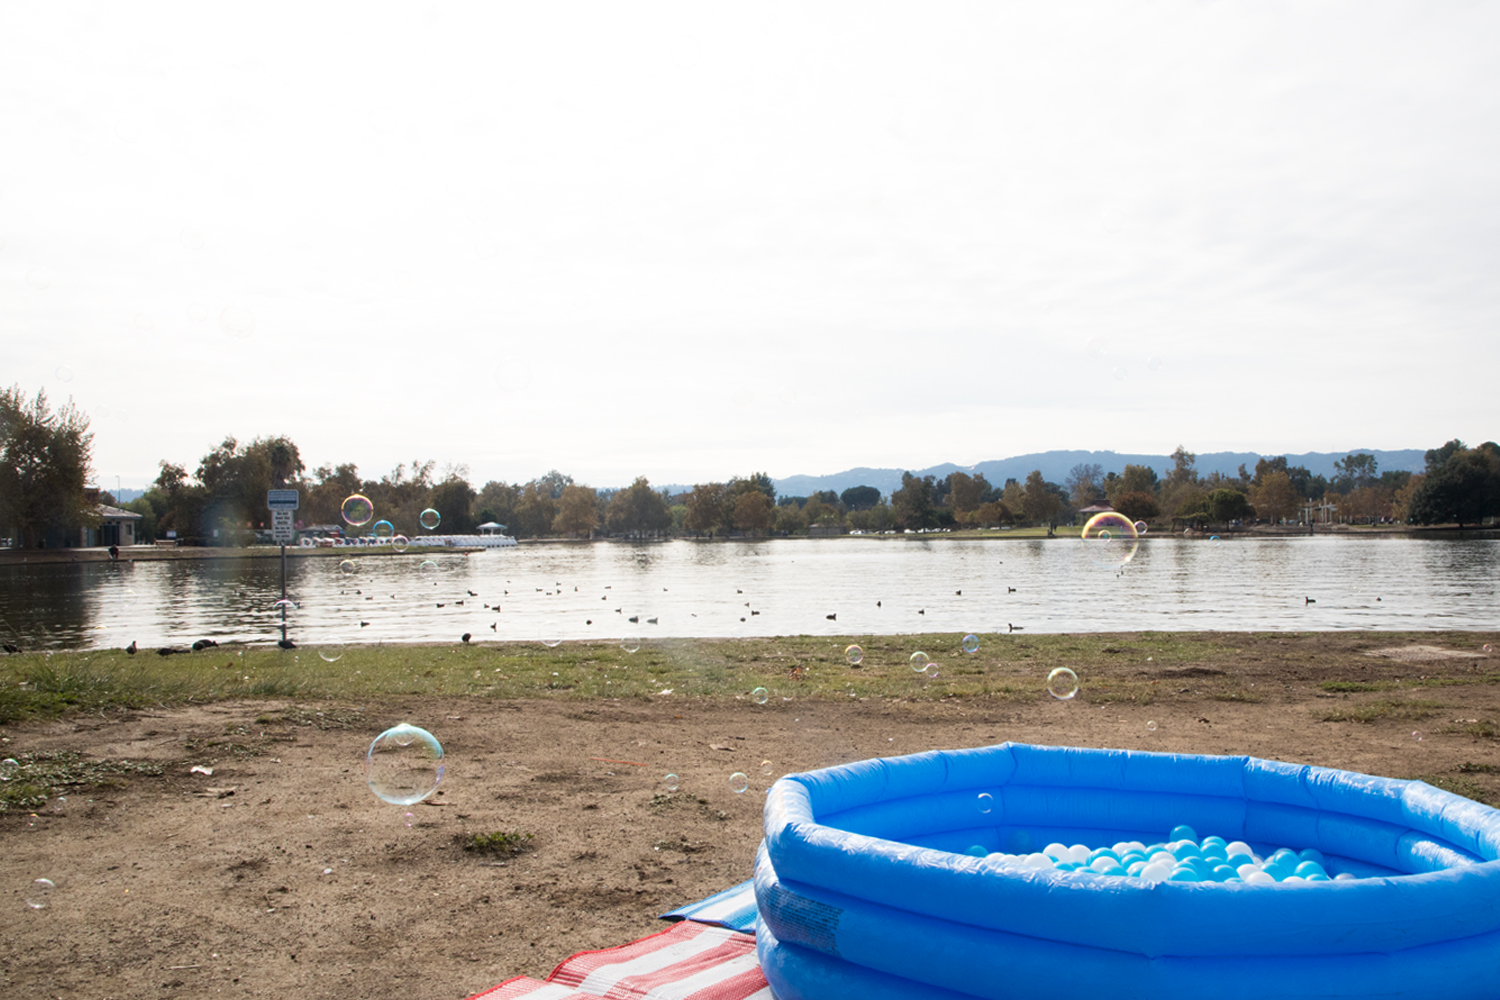
Ball pit. I remembered that almost makes perfect put together a similar ball pit here for her son’s first birthday party. I love following her. She is super creative and has great style. Especially for parties! We had taken Hue to Cayton Children’s Museum a couple of times and they have a ball pit with a boat in the middle and the balls are different colors of blue to act as water. Hue love this ball pit and always hangs out in there for a bit. I knew it would be a hit and ordered these or similar to these pit and these balls.
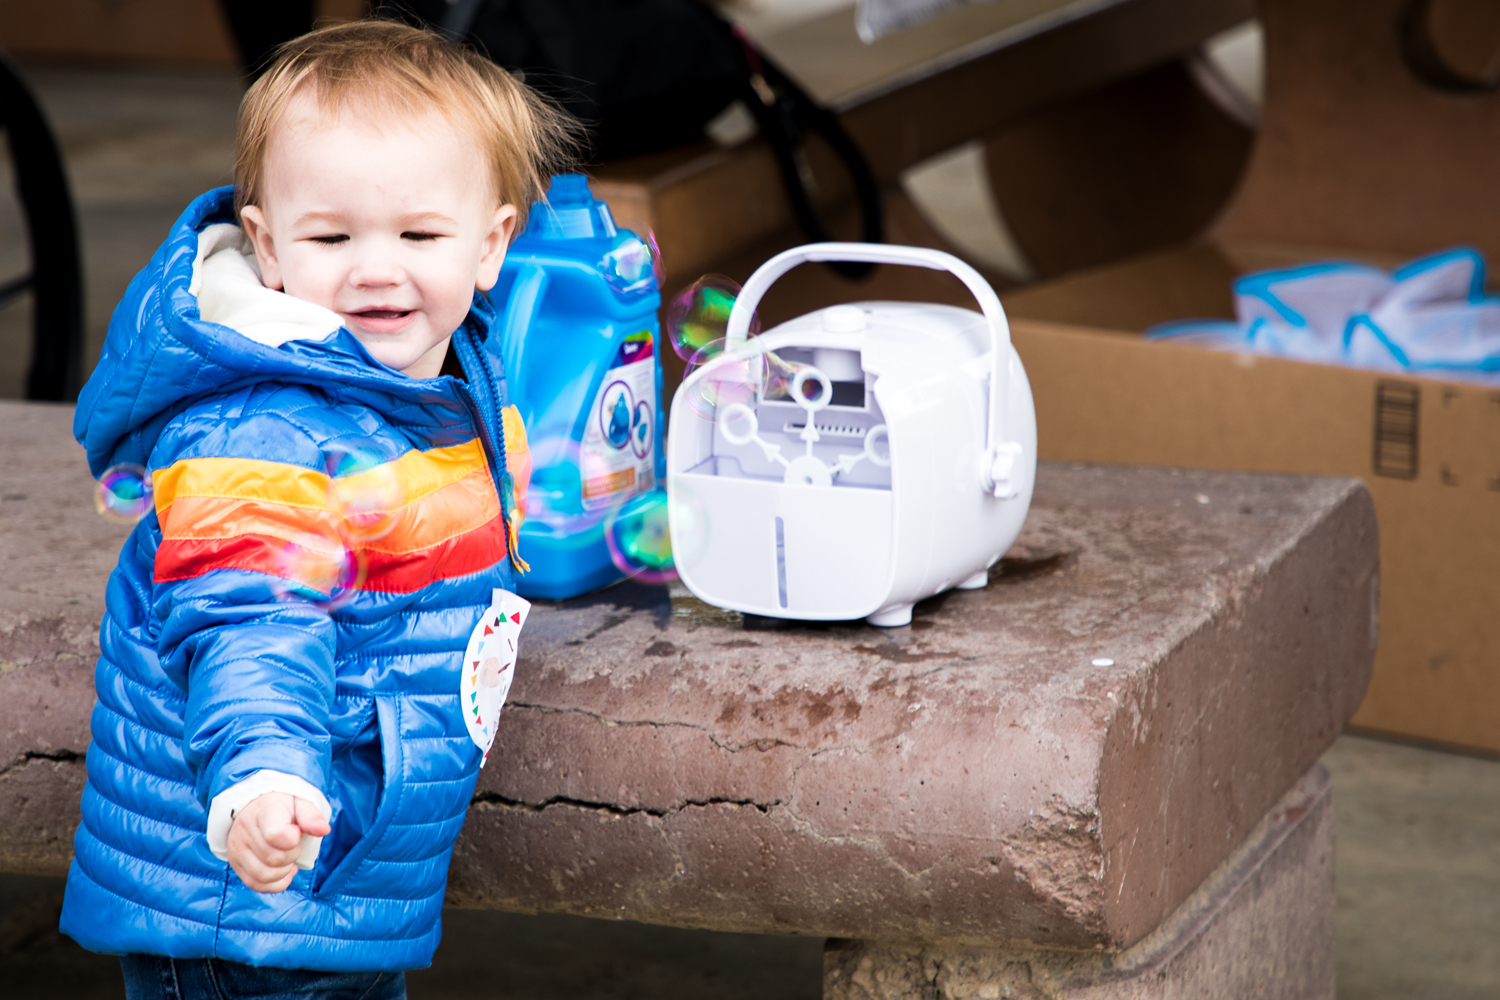
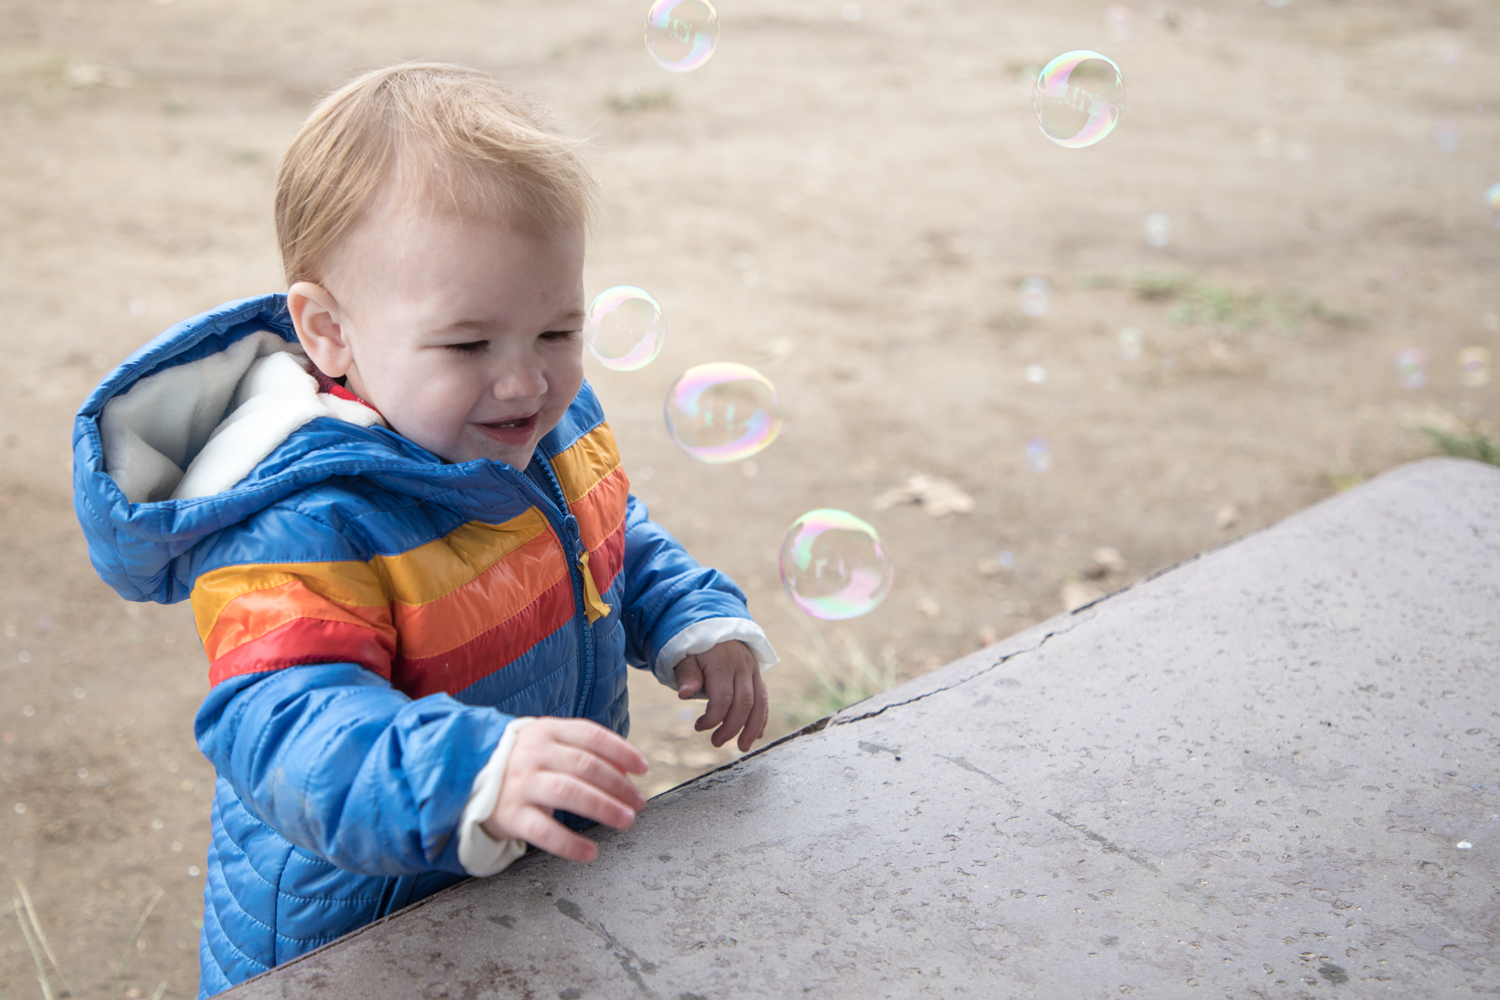
Bubble Machine. Hue loves bubble time at the end of story time at the library. So I knew I had to have bubbles at his party. An automatic bubble machine was the only way to go! We got bubbles here too!
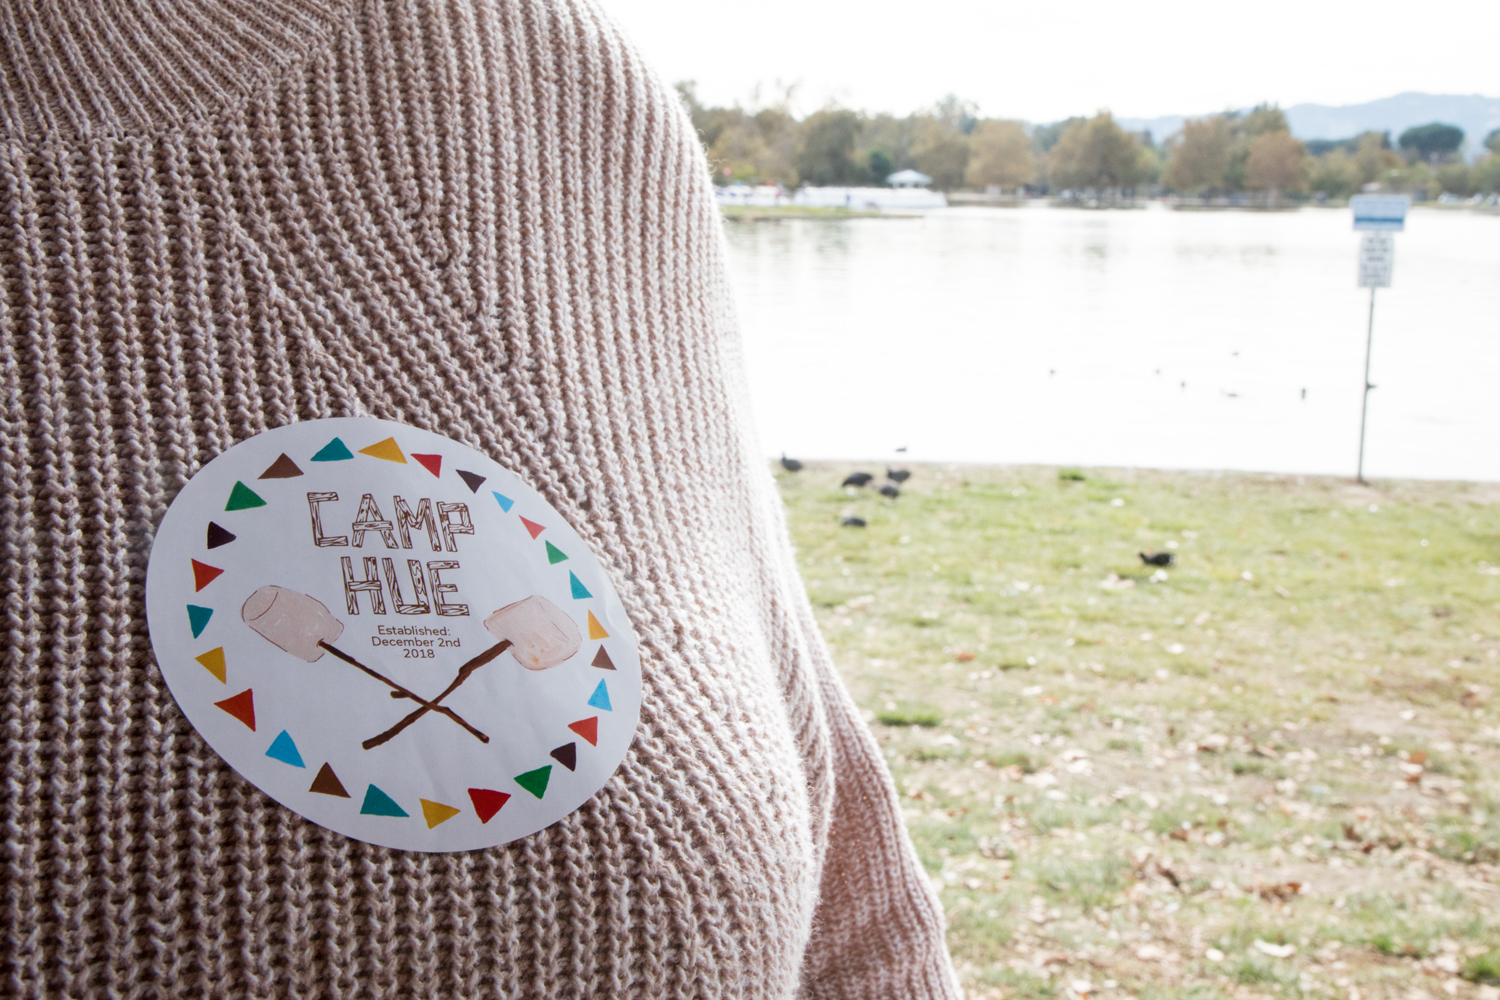
Camp Badges. I talk about these in this post here. I made them for people to wear like camp badges. People loved them! They saw me wearing the “Camp Hue” sticker and as soon as I greeted them they were like, “Do I get to wear a sticker?” It was awesome! At one point most people were wearing a “Camp Hue” sticker. Even Hue! I thought for sure he would rip his off but it stayed on for a while! I used them for some decorations and for the thank you cards too. I love these stickers because I hand made them using assets I had made for the birthday invitation. It was one more thing that helped tie the theme together.
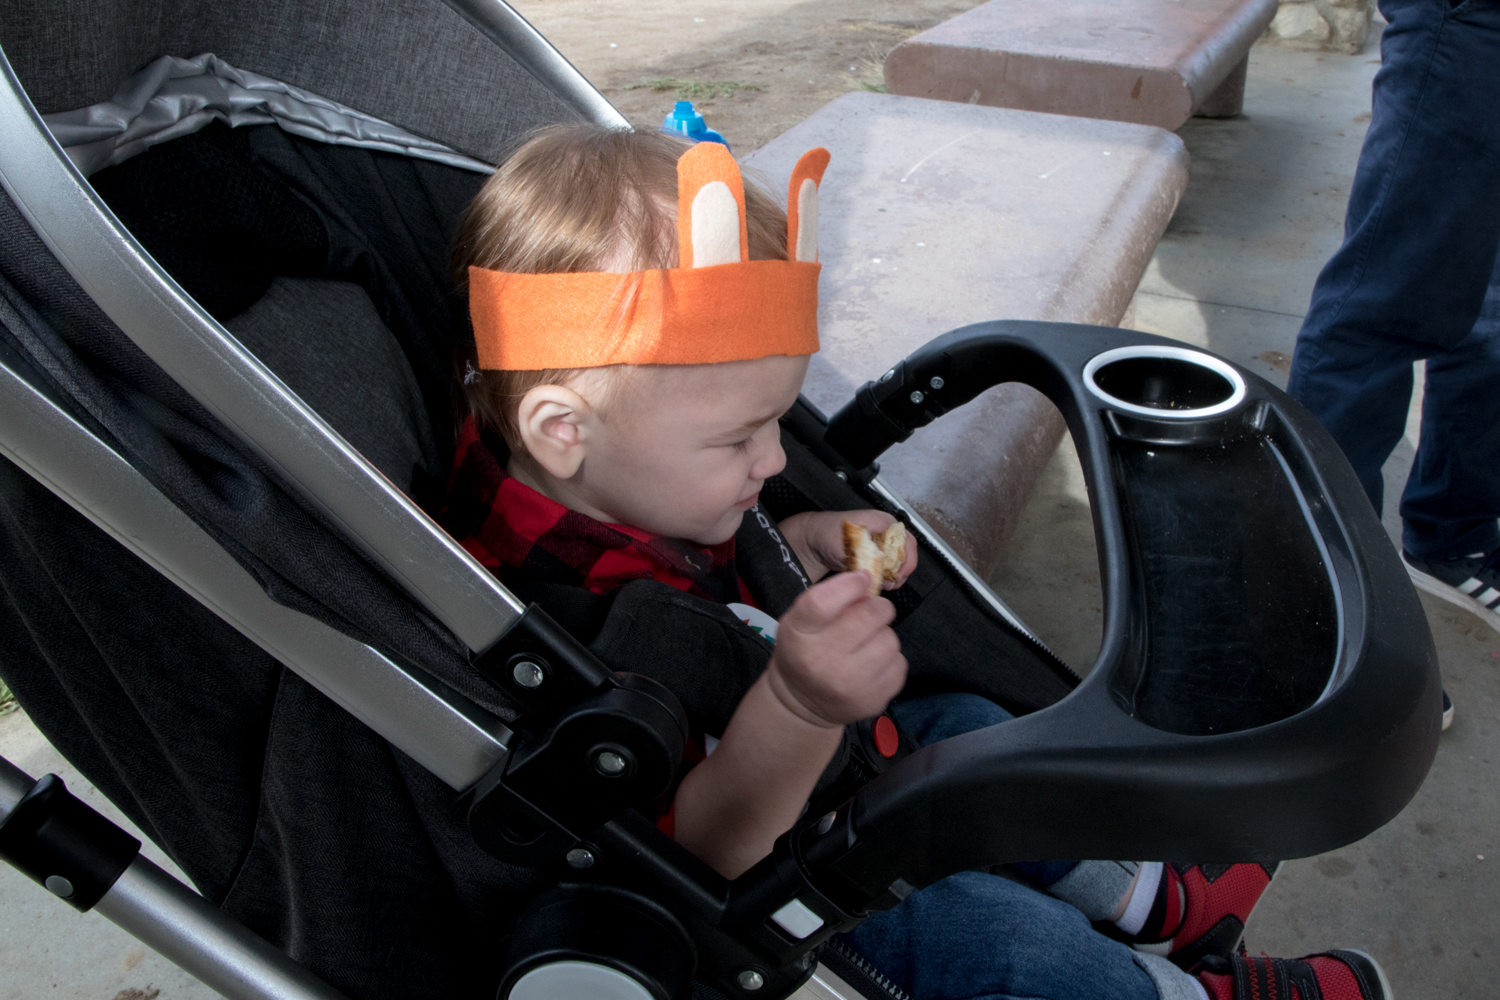
Animal Ears! This was just a cute play on the animals I put in the invitation. I made a squirrel, a fox, a skunk and a raccoon. I made two of each. I made the front by cutting a long rectangle felt shape and then I just looked up each animal to get the ear shape right. I added the ears to the middle part of the rectangle shape and I glued it so the ears were peaking out from the rectangle. I enclosed the rectangle with a thick elastic piece. I measured Hue’s head and made all of them to fit around Hue’s head size. They were cute and the little kids wore them. Just one more thing to tie the invitations and the party together.
Games! Well, one game actually. I still wanted something to engage the adults besides crafts and food so I made this questionnaire. You can check out the one I made for Hue here. People loved it! I said you can use social media as your friend kind of like a quick cheat sheet! Some people claimed it was kind of hard but we were all laughing and it was a cute way to remember verbally Hue’s first year. Someone asked me if I had saved all the answers and I wasn’t thinking during clean up and threw them away but would have loved to look at people’s answers and maybe taken a collective photo of them all! Would of, should of, could of… right? Anyways. I had a two small gifts for first and second place winners. My college friend won first place and our childhood friend won second place… I got this cute first aid kit from target to go with the camp theme and a similar bath bomb as the prizes. I let first place choose what they wanted first. They felt special to get gifts and I felt special that they knew/remembered so much information!!!


Food + Thank You Bags
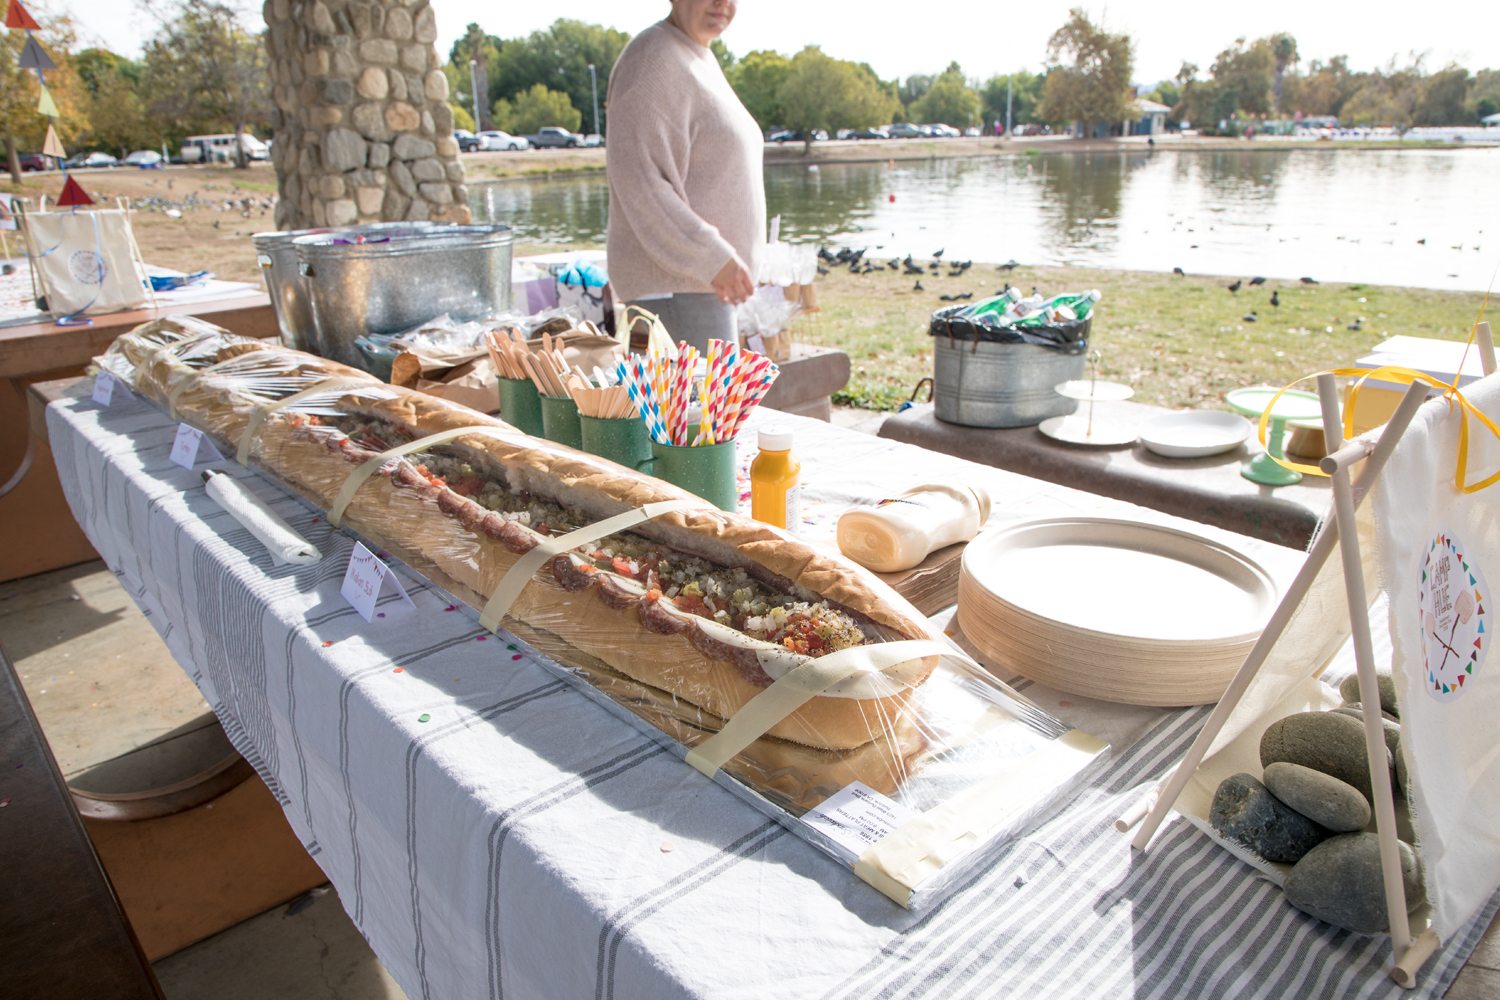
Lunch. I originally wanted camp food like hot dogs and hamburgers. Complications on how to keep hot food hot was too much for my brain so we went with a 6 foot submarine sandwich from a delicious sub shop in Burbank. I had a good friend who lives in Burbank pick the sandwich up on her way to the party. I got half Italian and the other half I split between turkey and veggie. Jake really wanted pizza so I had him in charge of that and he picked it up on the way to the party. He came later with Hue. I bought a mixed box of lunch sized chip bags. I got water, Pellegrino and some soda for the beverages. If it had been at my house I would have had beer and wine but not ideal for a park. I got chocolate chip and sprinkle cookies from Porto’s. I homemade my now famous molasses cookies that I did a post on here. I had individually wrapped them in and closed them with some washi tape. People were putting them in their pockets for later! In fact people were taking all the leftovers home.
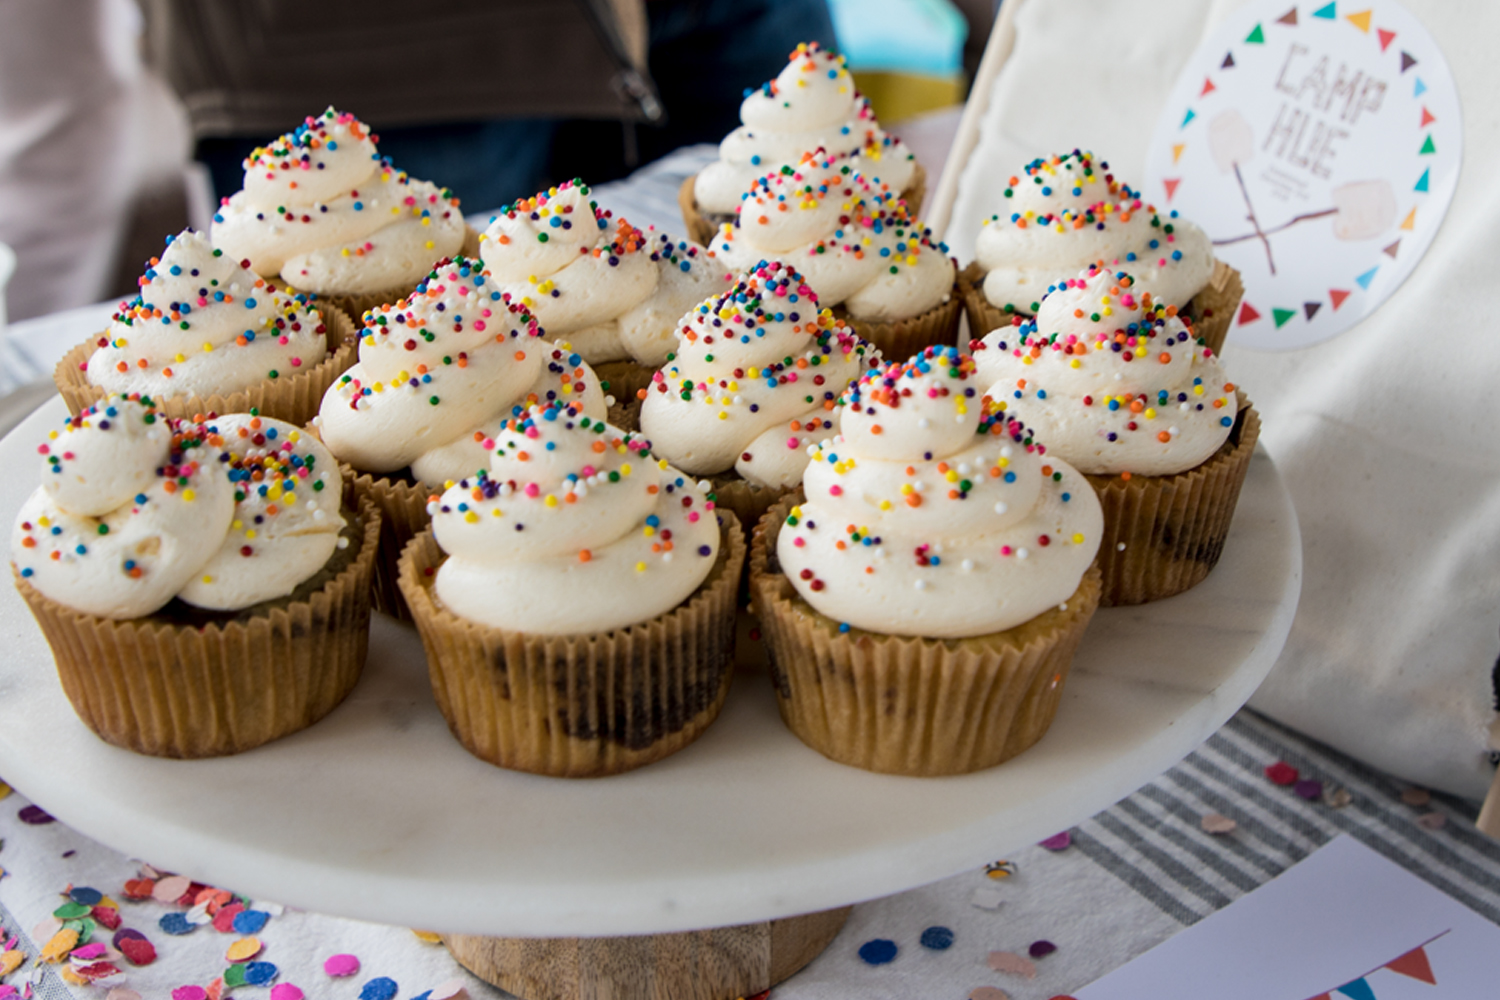
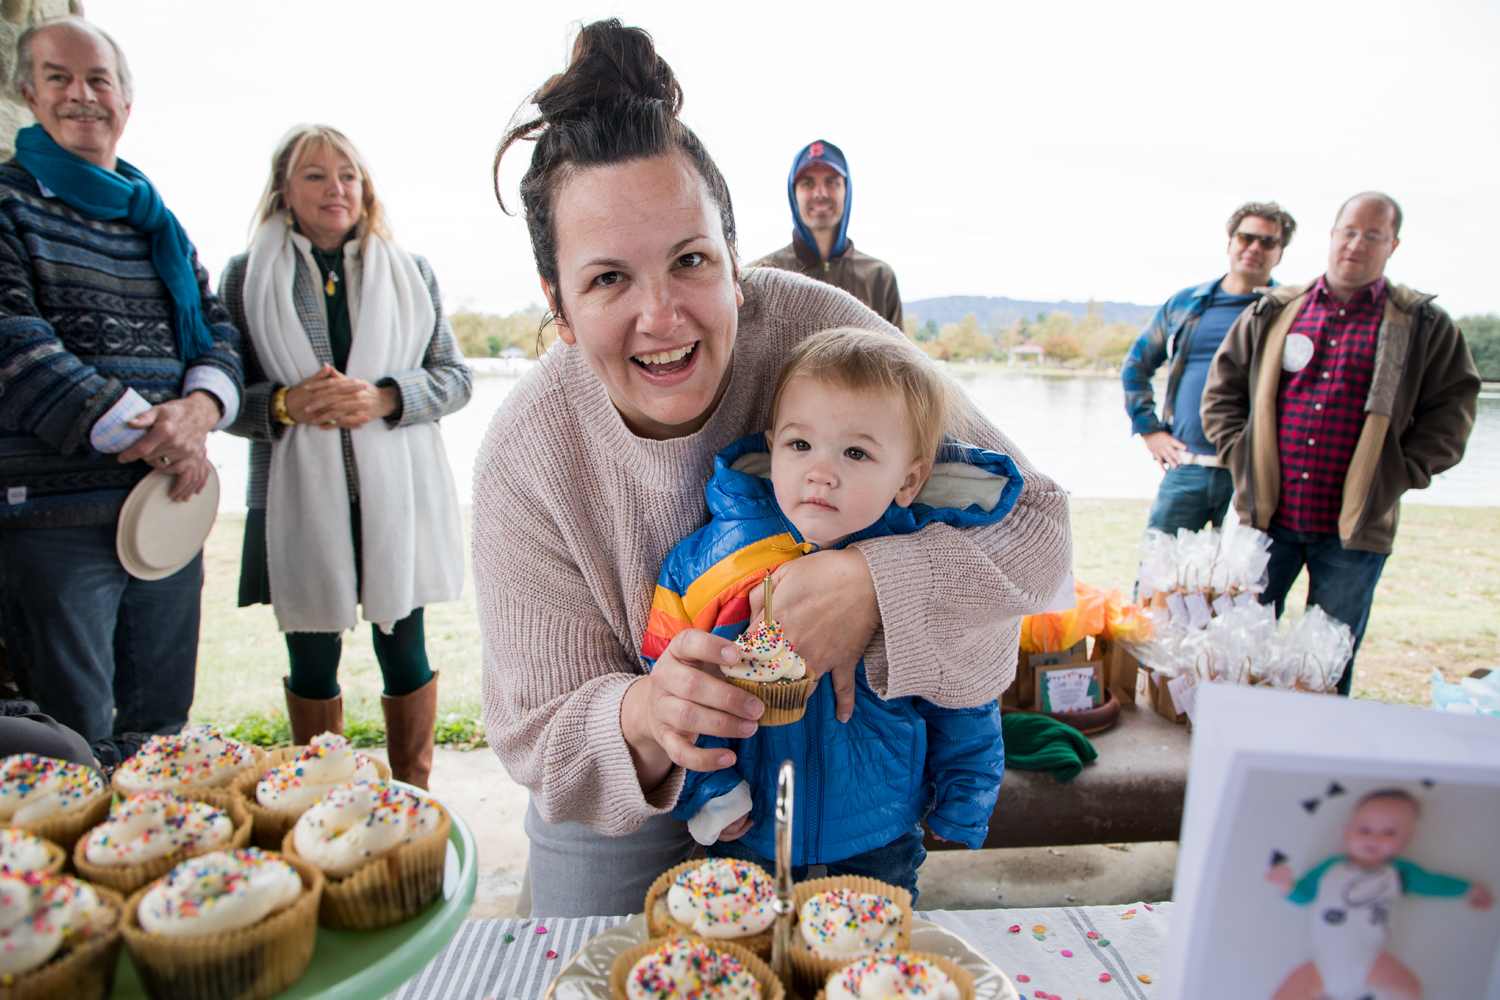
Hue’s first cake! I decided to go with cupcakes. Homemade cupcakes. I did a trial run about the week before to see how they turned out and I was happy with the results and confident I could make them for a crowd. My inspiration came from two places. I wanted them to look like these and taste like these. On my practice run the chocolate/vanilla swirl did not look as beautiful as the Candid Appetite’s so I decided for the final look to omit the swirl and just do vanilla buttercream instead. I added some colorful sprinkles to go on top. These were delicious and a big hit as well. When I placed the order for the cookies at Porto’s, I also asked to buy some cupcake boxes so I could transport the cupcakes from my house to the park. A lot of people thought I actually bought the cupcakes from Porto’s! Buying the boxes from Porto’s were cheaper and way better than the boxes I had bought from Michael’s. The cupcake boxes on Amazon were pretty expensive so I got creative and knew Porto’s sold cupcakes so I just asked if they were willing to sell some to me. I think three boxes were under $5. It was a deal.
Thank You Bags! I did two. One for the kids and one for the adults. I kept the camping theme when doing both. For the kid thank-you bags I found these cute scavenger hunt bags in the dollar section at Target over the summer. They were kind of falling apart at the seams when I finally pulled them out and opened them. I just glued them back together. I also had to throw away a couple that fell completely apart. I don’t know if the glue had dried or what but I was kind of annoyed by this for a moment. I had this party planned from top to bottom and I didn’t have a back-up bag idea. This was a make-it-work moment for sure. Inside the bags I filled them with compasses that were also carabiners, whistles (Hue still loves this whistle.) and some glow sticks. All things you need while camping! I found this cool yellow to orange ombre tissue paper at Micheal’s and thought it would kind of look like a campfire flame.
For the adult thank-you bags I kept it simple by filling up plastic bags with s’mores. I got the “Smashing Smores” in the candy isle at Trader Joe’s. Also a big hit! I made signs for both the kids and adult bags so there was no confusion of what bag was for who. I glued the signs to some 12 inch wood dowels. I also made little thank you cards on the adult bags.


How did I pull this all off?!?! I planned so far in advanced. I reserved the picnic table and paid a $75 fee to have it reserved for the whole day in September. I pre-ordered the six-foot sub, the cookies, the stickers and the balloons. I had a list of all the diy stuff I wanted to do and started making the ones that could be done in advance. My problem is my brain gets inspired by what I am doing and making so then I start realizing ALL the things I could make. So I know I will be adding last minute stuff. The animal ears, the adult thank-you bag card, the thank-you bag signs differentiating the adult bags from the children bags were all last minute additions. The smashing s’mores were a last minute change too. I was going to hand make the chocolate dipped s’mores but decided to change my mind and take one thing off my huge to-do list.
I had a list on a clipboard the day of that I knew needed to get done. I checked it off as each item got completed. I had a few close friends come to the park early with me to set up. We got there about two hours early to get everything done. In fact we were done with some time to spare. I treated the set-up like a photoshoot so I knew it would take more time than I thought. Luckily my friends are all super talented too and know how I work so they just knew how to help in the best possible way! Basically they let me delegate my to-do’s to them for a couple of hours!
There were some things out of my hands too. Like the weather. It was threatening to rain on and off for the month before. It was abnormally cold for Los Angeles. The grass has grown in a lot since the party and I wish the ground wasn’t so bare the day of. Some things that were in my hands but I didn’t do were… I should have brought coffee and hot chocolate. It was cold and this would have made the cold weather a little more bearable. I should have purchased a blue-tooth speaker for music. I had music playing on my cell-phone but it moved where I moved. It was weird.
That’s it! Besides the couple of things that I wish had been different it was kind of a perfect first birthday for Hue. I had a couple of people say that I should be doing party planning as a living! They were so impressed with all the details. I planned this party like it was a job because I wanted it to be perfect for Hue and for us as a family! I made promises over and over that next years party will be way tamed down. Ideally I would love to have a small party for him in maybe our new home… We don’t have one yet. Just dreaming…
tadalis sx
tadalafil daily use https://elitadalafill.com/ generic tadalafil united states